Unreal Engine 4: use Swarm to distribute Lighting build on Local Network
This is a quick tutorial on how to install and configure Unreal Engine 4’s Swarm Agent and Coordinator to distribute Lighting build (that is, UE4’s Lightmass’s ray-tracing precomputations, running on the CPU) across a Local Network of 64 bits Windows 10 machines. There are already a few good ressources on the subject, but I had to read through a bunch of them to pick all the needed information.

Existing online documentation
- Edit: There is now a brand new official documentation of Unreal Swarm!
- UDK’s documentation Unreal Swarm – Massive Application Distribution for Unreal Engine 3 is actually quite good, though not entirely up-to-date
- UE4’s documentation Lightmass Global Illumination is more high level, and lacking a section on Swarm Settings
- Brian Goodsell’s Tutorial: Setting Up Swarm for Multiple Machines is very good but slightly out-dated, not saying how to install the Swarm tools
- Niberspace’s Is UE4 Distributed Rendering Worth It? gives information on the performances you can expect of it
- Baking with Swarm gives a lot of in-details technical information (but far too much)
- Edit: Swarm Agent Troubleshooting (wiki) seems to be the source of some of the official documention :)
- Edit: And now, a great Youtube tutorial:
What is Swarm
The Swarm Agent is the process launched in the background (daemon) when you hit “Build Lighting” on your Unreal Engine Editor. That is, it is the application that bake your lighting in the UE Lightmass. By default it uses your computer’s CPU cores to do so.
The Swarm Coordinator is a sibling process that you can launch manually to distribute your Lighting build on multiple Agents across the network.
Installation of Agent/Coordinator
Installation on a Windows 7/8/10 64 bits up-to-date is straightforward:
- You need the .NET 4.0 framework, which comes by default with any recent version of Windows.
- You should also deactivate the power saving/standby mode on every PC, else it will disable the Swarm Agent on the sleeping machines.
Note that this should also work on Linux & macOS with wine.
To install, you can either:
- Use existing installation of Unreal Engine on each computers of the network. All versions are cross-compatible so you can distribute your Lightmass work to Swarm Agents of outdated UE4 installation without any problem.
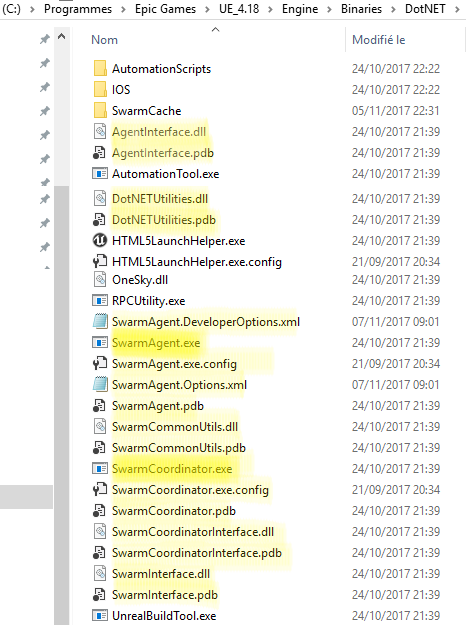
- Or, on computers without UE4, just copy the content of the Engine/Binaries/DotNET folder. You don’t need all this files, and no subfolders, but the whole is only a few MB in size. Put this on a fast disk with more than 10 GB free space for Agent cache.

You need to choose an always-on machine, like a small/old server to act as the Swarm Coordinator. If you don’t have one, you can select any other Agent machine to host the Coordinator, but you should ensure that it stays online all the time you need it! On my use-case, I’ve selected my laptop (named “ASUS-I7”) to be the Coordinator, so that I can use it when away.
Lastly, you should ask the system to auto-start the Swarm Agent (and/or Coordinator on the selected machine) when the user log-in. To do so, put a shortcut to the executable on the Windows Startup folder, which is located here:
C:\Users\x\AppData\Roaming\Microsoft\Windows\Start Menu\Programs\Startup\
Swarm Agent Settings
The Coordinator does not really need any settings. You need to accept the Windows Firewall request to let it communicate freely, though!
The Swarm Agent needs to be told how to distribute it’s work. To do that, launch the Swarm Agent if it is not already running, and double-click on it’s small icon hidden on the tray bar:
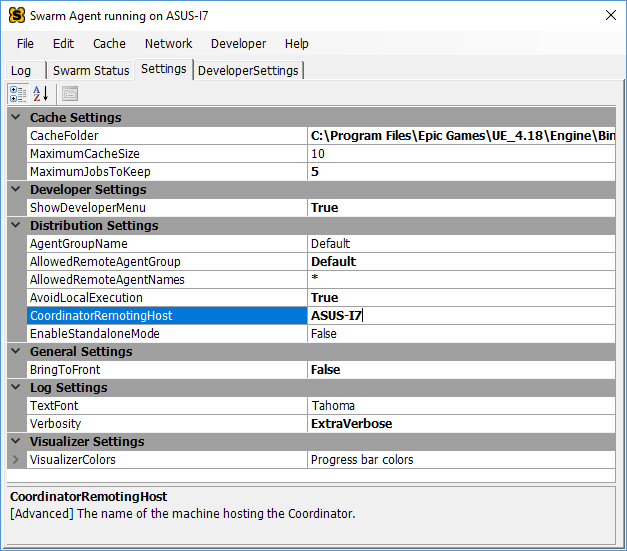
Go to the “Settings” tab of its UI:

Here, the only important Settings are (in bold those you need to change):
- AgentGroupName: Default (is fine)
- AllowedRemoteAgentGroup: Default (to match, instead of DefaultDeployed)
- AllowedRemoteAgentNames: * (to match everything, instead of RENDER*)
- CoordinatorRemotingHost: ASUS-I7 (name or IP of the Coordinator computer)
Whenever you set the last one, the Coordinator should start to show the new Agent as soon as it connects across the network:

Usage
Next time you build your lighting on any computer correctly configured, you should get your work distributed across multiple Agents, assuming that:
- the Coordinator is up,
- other Agents are running, connected and Available (not Busy, Working, nor Dead),
- and your workload is big enough to distribute (enough mesh to bake lighting onto)
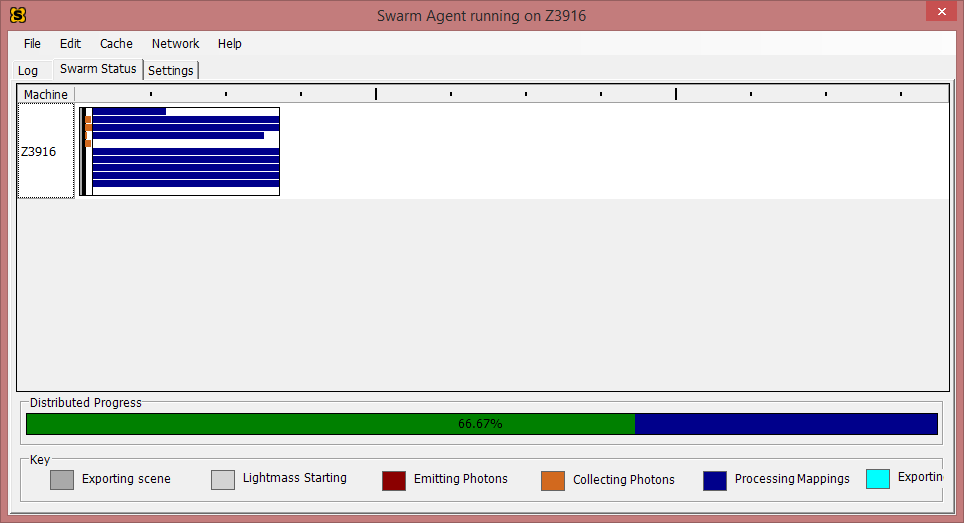
At this stage, a look at the local Agent will tell show you the following Status:

A look at the Coordinator will tell you the Agent(s) involved in the work:

I hope this can help, and show how all this is incredibly easy and worthy to setup!
